
Add Z-Wave to your garage door with the MultiRelay by following the instructions in this article. Please check your local safety regulations first and make sure you test the device carefully after programming it to prevent accidental operation. The ZEN16 MultiRelay is NOT a reliable solution to track the open/close status of your garage door. You will need to install a Z-Wave contact or tilt sensor on the garage door to track its position. It's recommended to have an audible alarm (like the ZSE50 Siren & Chime) go off whenever the doors are being opened or closed remotely.
The below instructions cover how to wire the ZEN16 with the wall switch on the input and the garage door on the output. If you would like to use a reed switch or wired contact sensor to monitor the status of the garage door, make sure you are using the 700 or 800 series version of the ZEN16, and you can follow the instructions found here.
Here are detailed instructions on how to accomplish an easy and affordable DIY Z-Wave garage door opener solution with the ZEN16 MultiRelay on any Z-Wave hub that supports the ZEN16 MultiRelay and Z-Wave open/close sensors.
1. WIRE THE MULTIRELAY ZEN16
The device will work great with simple momentary garage door wall switches. If your garage door opener uses a proprietary wireless control system, you will NOT be able to use the ZEN16 MultiRelay (or any other Z-Wave device) to control the opener.
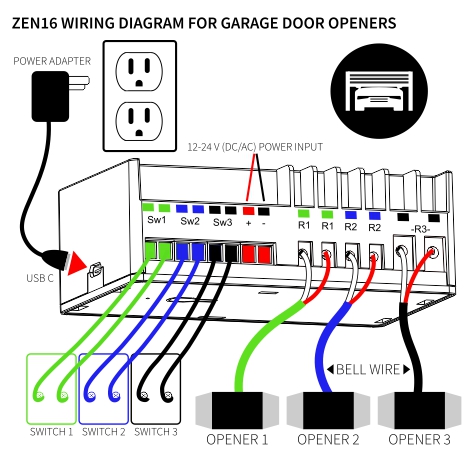
If you have a simple one-button garage door switch, just use the below diagram to wire the MultiRelay next to it (you can wire up to 3 door switches to a single MultiRelay):
-
WIRING TIPS: Always take "before" pictures just in case you need to restore the original set-up or send us images for consultation. use the correct screwdriver size for the terminal screws on your MultiRelay and wall switches (if connecting them). Use appropriate electrical tools when cutting, prepping, and stripping electrical wires. If you don’t have the necessary tools to perform the installation or are not sure which tools to use or how, please hire an electrician to complete the installation for you. Follow the National Electrical Code and your local safety regulations when performing the installation, including (but not limited to), choosing the correct gauge of jumper wires. The recommended gauge for 15 Amp circuits is 14 AWG and 12 AWG for 20 Amp circuits.
-
POWER OFF: turn the circuit power off in the breaker panel before you start. Keep the MultiRelay unplugged from its power source.
-
DISCONNECT THE SWITCH: Open the switch cover and disconnect the 2 wires coming to it from the opener.
-
CONNECT THE MULTIRELAY: Connect the 2 wires coming from the opener to the R1 terminals on the MultiRelay and run 2 jumper wires between the wall switch screws and Sw1 terminals on the MultiRelay as shown in the below diagram.
If you have a wall switch with a light button on it as well and would like to continue using it to turn the light on, please use the below diagram instead (only for use with this particular type of wall switch):

-
RESTORE POWER: Connect the opener and ZEN16 MultiRelay back to the power source. Please do NOT use laptop chargers or Apple accessories with the MultiRelay. NEVER connect DC power and USB power to the ZEN16 at the same time.
-
The power supply only provides power to the Z-Wave chip and electronics within the unit. Therefore, the power supply doesn't need to be rated for a lot of power,
- USB C with a 5V / .5A - 1 A Power Adapter plug (you just need a USB-C wall adapter, the USB-C cable is included with the device)
-
The power adapter must be a basic 5V / .5-1A USB-C power supply. Do not use Apple chargers or any USB PD (Power Delivery) adapters, as they may output higher voltage and damage the device.
-
-
12-24 V AC/DC adapter (or any other 12-24 V AC/DC power supply)
-
We highly suggest testing the output voltage of your power supply, especially when powering the ZEN16 from a 24V transformer. We're finding many newer transformers that are rated for 24V are actually outputting more than 28-29V, which will damage the ZEN16.
-
- USB C with a 5V / .5A - 1 A Power Adapter plug (you just need a USB-C wall adapter, the USB-C cable is included with the device)
-
2. INSTALL ADDITIONAL Z-WAVE DEVICES TO COMPLETE THE SET-UP
-
Z-WAVE OPEN/CLOSE SENSOR: You will need a contact sensor to monitor if your garage door is open or closed. We recommend using a tilt sensor to reliably track the status of your sectional garage door but you can also use any Z-Wave contact sensor for that purpose.
-
Z-WAVE SIREN: We recommend using the ZSE50 Siren & Chime to sound an alarm whenever the door is being opened or closed remotely for added safety.
3. PROGRAM THE MULTIRELAY ON YOUR SYSTEM
-
Add the MultiRelay ZEN16 and the open close sensor to your hub by following the instructions in the manual.
-
Don't turn the relay ON before completing Step 3. All relays should be in the OFF position now.
-
In the device settings, change the Input Type to Garage Door mode (it will enable momentary control of the relay via Z-Wave as well):
-
If your hub supports parameter input, just change Parameter 2 (for R1) to value 3 (size 1 byte dec). If you're using R2 and R3 for other gates, adjust parameters 3 and 4 to value 3 as well.
-
If your system doesn't give you access to advanced settings, you can change the switch mode through the Z-Wave button sequence directly on your device. For R1 mode change, press and hold the Z-Wave button for 5 seconds until the LED indicator blinks to change the mode to garage door switch. For R2 mode change, click the Z-Wave button twice but the second time hold it for 5 seconds until the LED indicator blinks. For R3 mode change, click the Z-Wave button 3 times but the third time hold it for 5 seconds until the LED indicator blinks.
-
Now test and rename the relays if needed. The relay should automatically turn off once you click ON in your Z-Wave interface and you should still be able to use your wall switch to operate the garage door. The Z-Wave door / tilt sensor will help you monitor the status of your garage door so you can create rules and automations to keep your garage door open only when it needs to be.
You will not be able to monitor the status of the garage door via the ZEN16. You will need to use the recommended Z-Wave sensor to report the on/off status. The Z-Wave sensor and the ZEN16 will not display as a single device in your Z-Wave hub UI.
If you need help with your set-up, please reach out to us for assistance. Always include your order number (even if it's from Amazon) and indicate which hub you're using for faster service.

