
Want to bring smart control to your gas fireplace? The ZEN58 Low Voltage XS Relay makes it easy to automate on/off control for fireplaces equipped with a millivolt gas valve—the same type used in most models operated by a basic wall switch. In this guide, we’ll show you how to wire the ZEN58 to safely control your fireplace, giving you the convenience of smart control while keeping your setup simple and reliable.
The fireplace must remain attended at all times during operation. Remote control should only be used when you are physically present on site.
WHAT YOU NEED
-
A gas fireplace equipped with a millivolt gas valve, which is standard in most gas fireplaces, operated by a simple wall switch.
-
A 120VAC outlet must be available near or inside the fireplace enclosure.
-
Appropriate power supply for the ZEN58 (9-40V), such as the one here: 12 V DC 0.5A Power Supply.
-
Existing mechanical wall switch (single-pole type).
Once you've confirmed you have everything needed for the install, please follow the instructions below to automate your gate opener on a budget with a DIY solution from the ZEN58 Low Voltage Relay.
WIRING TIPS
-
Before you disconnect any wires, document your set-up so you can send the images to us if any assistance is needed. We always need to see the fully working original installation in order to assist accurately.
-
Always use the correct screwdriver size for the terminal screws on your Z-Wave relay and wall switches (if connecting them).
-
Use appropriate electrical tools when cutting, prepping, and stripping electrical wires. If you don’t have the necessary tools to perform the installation or are not sure which tools to use or how, please hire an electrician to complete the installation for you.
-
Follow the National Electrical Code and your local safety regulations when performing the installation, including (but not limited to), choosing the correct gauge of jumper wires. The recommended gauge for 15 Amp circuits is 14 AWG.
WIRE THE ZEN58 Low Voltage XS Relay
Now that you have assembled all of the parts, it's time to wire in the ZEN58!
POWER OFF: Always ensure the circuit power is off in the breaker panel before you start. Keep the ZEN58 unplugged from its power source while performing the installation.
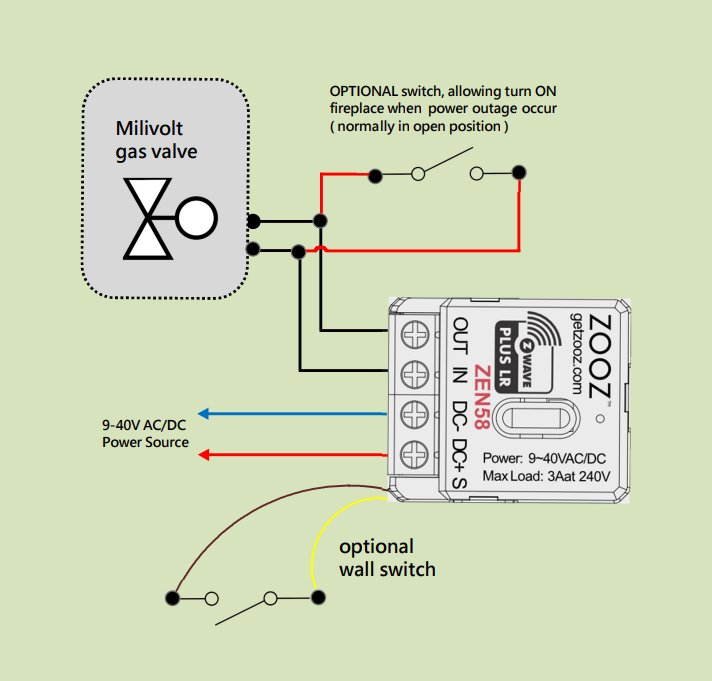
LOCATION: Install the ZEN58 between the switch and the milivolt gas valve, where you should have access to the 120V outlet for the 12 V DC 0.5A Power Supply.
HOW TO SECURE WIRES IN TERMINALS: Unscrew the appropriate terminal’s screw just far enough so there is a clear opening in the terminal for the wire to go in. Make sure the wire is stripped at the right length and perfectly straight before you insert it into the terminal. Once you put the wire in the terminal, carefully screw the terminal screw back in to hold down the wire. Check the connection by gently pulling on the connected wire to make sure it’s fixed securely.
CONNECT THE ZEN58:
-
Connect the original wire from the Fireplace Millivolt Valve to the existing wall switch on the wall. It needs to be traced in the fireplace (where the wiring is) and spliced in half.
-
Connect the wire from the millivolt valve side to the ZEN58 dry contact relay (IN and OUT terminals).
-
Connect the wire from the existing wall switch to the dry contact pigtails on the ZEN58.
-
The optional switch is wired in parallel with the main control circuit. When this switch is closed (for example, during a power outage), it provides an alternate path to close the circuit on the fireplace, bypassing the main control path.
Because it’s a normally open switch, it only affects the circuit when manually operated — exactly how a parallel bypass or override switch is typically used.
INCLUDE THE ZEN58 LOW VOLTAGE XS RELAY TO YOUR HUB
How to Include the ZEN58 Low Voltage Relay to Home Assistant
How to Include the ZEN58 Low Voltage Relay to HomeSeer
How to Include the ZEN58 Low Voltage Relay to Hubitat
How to Include the ZEN58 Low Voltage Relay to SmartThings
How to Include the ZEN58 Low Voltage Relay to Z-Box
How to Include the ZEN58 Low Voltage Relay to Your Z-Wave Hub
PROGRAM THE ZEN58 LOW VOLTAGE XS RELAY
You will need to be able to access the advanced settings for the device via your hub interface. We've provided the instructions below for the most common hubs:
How to Access the Advanced Settings for the ZEN58 Low Voltage Relay on Home Assistant
How to Access the Advanced Settings for the ZEN58 Low Voltage Relay on HomeSeer
How to Access the Advanced Settings for the ZEN58 Low Voltage Relay on Hubitat
How to Access the Advanced Settings for the ZEN58 Low Voltage Relay on SmartThings
How to Access the Advanced Settings for the ZEN58 Low Voltage Relay on Z-Box
Once you've accessed the settings as instructed above, please set the following on your ZEN58 Relay:
-
Parameter 5 (Input Type) set to Value 1 (Toggle Switch Mode). Now, the device changes state each time the switch is toggled.
EXPECTED OPERATION
Once installed, the wall switch will function like a normal 3-way setup, since Z-Wave control acts as a secondary input.
For example:
-
If the fireplace is turned on via Z-Wave, the physical switch will remain in the off position.
-
To turn the fireplace off, the switch must be flipped up once to sync with the new state.
Please let us know if you have any questions!

