
Don't forget to register your product to benefit from an extended warranty and other advantages:
FEATURES
-
Fast and reliable motion detection
-
Built-in motion detector
-
NEW 800 series chip for faster and more secure wireless communication
-
NEW Z-Wave Long Range for ultra reliable communication without meshing
-
Latest S2 security protocol and AES-128 signal encryption
-
2 alternative power sources: battery or micro USB SmartStart for automatic enrollment
-
Magnetic mount for quick and flexible installation
-
Adjustable LED indicator
-
Low battery alerts
SPECIFICATIONS
-
Model number: ZSE18 800LR
-
Z-Wave region: US/CA/MX
-
Power supply: 1 CR123A battery (3V) or micro USB
-
Z-Wave range: up to 150 feet (up to 1300 feet with long range enabled)
-
Operating temperature: 32-104° F
-
Installation and use: Indoor only
Z-WAVE CONTROL
ADD THE DEVICE TO YOUR HUB
Initiate inclusion (pairing) in the application (or the web interface). If you are using an S2 hub, you will be asked to enter the DSK PIN or scan the QR code printed on the bottom of the sensor to complete inclusion.
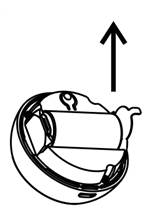
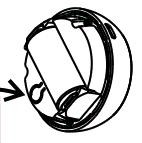
REMOVE THE BATTERY TAB
Turn to open the sensor cover to access the battery.

Battery activation will automatically put the sensor into inclusion mode.
If it is not added within 30 seconds, try factory resetting it and including it manually.
MANUAL INCLUSION (PAIRING)
-
Bring the sensor within direct range of your Z-Wave hub
-
Put the Z-Wave hub into inclusion mode
-
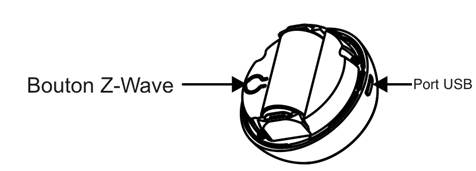
Press and release the Z-Wave button 3 times quickly. The LED indicator will begin to blink rapidly and will become solid for one second to confirm inclusion
-
A new motion sensor will appear in your device list
S2 SmartStart compatible products can be added to a Z-Wave network by scanning the Z-Wave QR code present on the product with a controller offering SmartStart inclusion. No other action is required and the SmartStart product will be added automatically within 10 minutes after being powered on near the network.
Choose your hub and then click on the link to access the step-by-step pairing instructions:
How to Add Your ZSE18 Motion Sensor to the Z-Box Hub
How to Add Your ZSE18 S2 Motion Sensor to Home Assistant
How to Add Your ZSE18 Motion Sensor to HomeSeer
How to Add Your ZSE18 Motion Sensor to Hubitat
How to Add Your ZSE18 Motion Sensor to SmartThings
TROUBLESHOOTING
Trouble adding the sensor to your hub? Try this:
-
Initiate EXCLUSION on your hub and click the Z-Wave button 3 times quickly. Then try adding it again
-
Move the sensor closer to your Z-Wave hub and try adding it again
EXCLUSION (DEVICE REMOVAL)
-
Bring the sensor within direct range of your Z-Wave hub
-
Put the Z-Wave hub into exclusion mode
-
Press and release the sensor’s Z-Wave button 3 times as quickly as possible
-
Your hub will confirm exclusion and the device will disappear from your controller’s device list
Can't Add My ZSE18 Motion Sensor to Z-Box
Can't Add My ZSE18 Motion Sensor to Home Assistant
Can't Add My ZSE18 Motion Sensor to HomeSeer
Can't Add My ZSE18 Motion Sensor to Hubitat
Can't Add My ZSE18 Motion Sensor to SmartThings
FACTORY RESET
If your primary controller is missing or inoperable, you may need to reset the device to factory settings. To complete the reset process manually, press and HOLD the sensor’s Z-Wave button for at least 20 seconds. The LED indicator will begin to blink blue. Once it becomes solid blue, immediately release the button. The LED will blink once to indicate that the factory reset was successful.
NOTE: All previously recorded activity and custom settings will be erased from the device’s memory.
WAKE UP MODE
The sensor wake-up interval is set to 12 hours by default to save battery. You can change the wake-up interval in the advanced settings if available in your system. During wake-up, the sensor receives communication from the gateway (parameter updates or network information). A long wake-up interval will not affect how often the sensor reports motion or vibrations to your gateway.
Manual Wake Up: Press and HOLD the Z-Wave button for 5 seconds to wake up the device. The LED will begin to blink.
You may need to wake up the sensor manually IF:
-
It does not fully configure during installation (status does not display or errors appear in your gateway interface)
-
You change the sensor’s advanced settings and want them to update
-
You include the sensor in any automations
MOUNTING
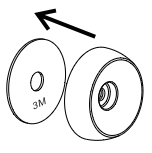
Recommendations: Use the mounting screw to securely attach the magnetic base to a flat surface of your choice.
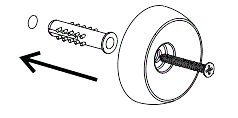
OR: Use the adhesive tape to stick the base to a clean surface for a quick and hassle-free installation.
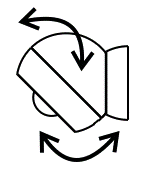
Positioning: Attach your sensor to the magnetic base and position it to cover the area you want to monitor. For best results, mount the sensor within 20 feet of the door and about 7 feet from the floor.
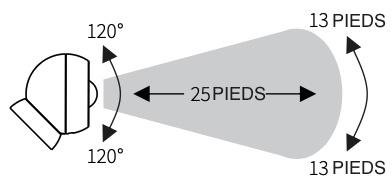
MOTION DETECTION RANGE
-
25 FEET (front range)
-
13 FEET (left/right range)
-
120° detection angle
-
See Settings for ways to optimize and customize motion detection and activity reports
ASSOCIATION
Associate your Motion Sensor with other Z-Wave devices for direct communication between them so that your rules and automations can take place even if the gateway is down. The Motion Sensor supports Group 1 (motion detection and battery level) and Group 2 (BASIC SET) with up to 5 devices for backup communication. To associate the sensor with other devices, put your Z-Wave controller into Association mode by sending the appropriate command and wake up the sensor by pressing and holding the Z-Wave button for 5 seconds.
SETTINGS
Please consult your controller’s user guide for advanced programming instructions, as they are slightly different for each software.
ZSE18 Motion Sensor Advanced Settings
How to Access the Advanced Settings for the ZSE18 Motion Sensor on Z-Box
How to Access the Advanced Settings for the ZSE18 Motion Sensor on Home Assistant
How to Access the Advanced Settings for the ZSE18 Motion Sensor on HomeSeer
How to Access the Advanced Settings for the ZSE18 Motion Sensor on Hubitat
How to Access the Advanced Settings for the ZSE18 Motion Sensor on SmartThings
USB POWER
When used with a USB power adapter, the sensor will act as a Z-Wave signal repeater.
RANGE TEST TOOL
You can easily check if the sensor is within range of your Z-Wave gateway:
Press and hold the Z-Wave button for 10-15 seconds and release it to start the test. The LED indicator will then report the signal strength:
-
Solid blue = direct communication with the primary controller is stable
-
Slow blinking blue = communication quality is acceptable
-
Fast blinking blue = communication with the primary controller has failed
Press and release the Z-Wave button to exit test mode.
COMMAND CLASSES
COMMAND_CLASS_ASSOCIATION_GRP_INFO_V1
COMMAND_CLASS_ASSOCIATION_V2
COMMAND_CLASS_APPLICATION_STATUS_V1
COMMAND_CLASS_BASIC
COMMAND_CLASS_BATTERY_V1
COMMAND_CLASS_CONFIGURATION_V4
COMMAND_CLASS_DEVICE_RESET_LOCALLY_V1
COMMAND_CLASS_FIRMWARE_UPDATE_MD_V5
COMMAND_CLASS_INDICATOR_V3
COMMAND_CLASS_MANUFACTURER_SPECIFIC_V2
COMMAND_CLASS_MULTI_CHANNEL_ASSOCIATION_V3
COMMAND_CLASS_NOTIFICATION_V8
COMMAND_CLASS_POWERLEVEL_V1
COMMAND_CLASS_SECURITY_2_V1
COMMAND_CLASS_SECURITY_S2
COMMAND_CLASS_SUPERVISION_V1
COMMAND_CLASS_TRANSPORT_SERVICE_V2
COMMAND_CLASS_VERSION_V2
COMMAND_CLASS_WAKE_UP_V2
COMMAND_CLASS_ZWAVEPLUS_INFO_V2
S2
This product can be included and used in any Z-Wave® network with other Z-Wave® certified devices from other manufacturers and/or other applications. All non-battery-powered nodes in the network will act as repeaters regardless of vendor to increase network reliability. This product features the latest Security 2 (S2) framework to eliminate the risk of smart home network hacking. This device is equipped with a unique authentication code for secure wireless communication.
WARNING
-
This product must be installed indoors or outdoors in a waterproof enclosure after completion of any building renovation.
-
Before installation, the device must be stored in a dry place, protected from dust and mold.
-
Do not install the device in a place exposed directly to sunlight, high temperature, or humidity.
-
Keep away from chemicals, water, and dust.
-
Make sure the device is never near a heat source or an open flame to avoid any fire.
-
No part of the device may be replaced or repaired by the user except the batteries.
WARRANTY
This product is covered by a 1-year limited warranty and a 5-year extended warranty once registered. To read the full warranty policy or file a warranty claim, please go here.
IN NO EVENT SHALL ZOOZ OR ITS SUBSIDIARIES AND AFFILIATED COMPANIES BE LIABLE FOR INDIRECT, INCIDENTAL, PUNITIVE, SPECIAL, OR CONSEQUENTIAL DAMAGES, OR DAMAGES FOR LOSS OF PROFITS, REVENUE, OR USE INCURRED BY THE CUSTOMER OR A THIRD PARTY, WHETHER IN A CONTRACTUAL ACTION OR OTHERWISE, EVEN IF ADVISED OF THE POSSIBILITY OF SUCH DAMAGES. ZOOZ’S LIABILITY AND THE CUSTOMER’S EXCLUSIVE REMEDY FOR ANY CAUSE OF ACTION ARISING OUT OF THIS AGREEMENT OR THE SALE OR USE OF THE PRODUCTS, WHETHER BASED ON NEGLIGENCE, STRICT LIABILITY, BREACH OF WARRANTY, BREACH OF AGREEMENT, OR PRINCIPLES OF EQUITY, IS EXPRESSLY LIMITED, AT ZOOZ’S OPTION, TO REPLACEMENT OR REFUND OF THE PURCHASE PRICE OF THE PORTION OF THE PRODUCTS FOR WHICH DAMAGES ARE CLAIMED.
FCC NOTE
THE MANUFACTURER IS NOT RESPONSIBLE FOR RADIO OR TV INTERFERENCE CAUSED BY UNAUTHORIZED MODIFICATIONS OF THIS EQUIPMENT. SUCH MODIFICATIONS COULD VOID THE USER’S AUTHORITY TO USE THE EQUIPMENT. STORE INDOORS WHEN NOT IN USE. SUITABLE FOR DRY LOCATIONS ONLY. DO NOT IMMERSE IN WATER. DO NOT USE WHERE DIRECTLY EXPOSED TO WATER.
This device complies with Part 15 of the FCC rules. Operation is subject to the following conditions:
-
This device may not cause harmful interference,
-
This device must accept any interference received, including interference that may cause undesired operation.
This equipment has been tested and found to comply with the limits for a Class B digital device, pursuant to part 15 of the FCC rules.
These limits are designed to provide reasonable protection against harmful interference in a residential installation. This equipment generates, uses, and may emit radio frequency energy and, if not installed and used in accordance with the instructions, may cause harmful interference to radio communications.
However, there is no guarantee that interference will not occur in a particular installation.
If this equipment causes harmful interference to radio or television reception, the user may try to correct the interference by taking one or more of the following measures:
-
Reorient or relocate the receiving antenna Increase the separation between the equipment and the receiver
-
Connect the equipment to an outlet or a circuit different from that to which the receiver is connected
-
Consult the dealer or an experienced radio/TV technician for additional help
All trademarks displayed are registered trademarks of their respective owners.
© Zooz 2025

