


The Zooz ZEN12 Motion Dimmer combines dimming control, scene control, motion detection, and ambient light monitoring in a single device. Its three physical buttons can trigger HomeSeer events through Central Scene commands or directly control other Z-Wave devices using Direct Association. The built-in motion and lux sensors can also be used to trigger HomeSeer events or directly control associated Z-Wave devices. The multi-color LED indicator can be customized or programmed to reflect the status of another device in your system.
Below, we will cover Central Scene programming, Direct Association, and LED indicator programming on HomeSeer.
Zooz products are officially integrated with the Z-Wave Plus plugin and Z-Wave JS Front-End for HomeSeer. If the ZEN12 is not displaying correctly or you cannot access all of its settings, first update the Z-Wave Plus plugin or Z-Wave JS Front-End. You may then need to exclude and re-include the ZEN12 so it is interviewed and recognized correctly. You can find all available configuration parameters in the ZEN12 Motion Dimmer Advanced Settings.
Central Scene / Scene Control
Central Scene programming allows the ZEN12 to send button-press information to HomeSeer. HomeSeer interprets the command and runs the event you created for that button and press type. This provides more flexibility than standard on/off control because each button can trigger multiple actions based on whether it is tapped once, tapped multiple times, held, or released. For example, you could program the main button to control the connected light normally while using a double tap to turn off every light in the room. The smaller dimming buttons can also be programmed to trigger separate events without changing their normal dimming functions.
Enable Scene Control
Scene control is disabled by default on the ZEN12, so before programming Central Scene events in HomeSeer, ensure you set Parameter 8 to value 1. Here is how to access the settings for the ZEN12 on HomeSeer.
-
Parameter 8: Scene Control
-
Value 0: Scene control disabled
-
Value 1: Scene control enabled
-
Size: 1 byte
If you want to retain only single-tap scene reports and disable multi-tap, held, and released reports, set Parameter 40 to value 1. Leave Parameter 40 set to its default value of 0 for full scene control functionality.
Scene Numbers and Button Mapping
The ZEN12 uses the following Central Scene numbers:
|
Button |
Scene number |
Description |
|---|---|---|
|
Main button |
1 |
Large on/off button |
|
Left dimming button |
2 |
Decreases brightness by default |
|
Right dimming button |
3 |
Increases brightness by default |
|
ZAC99 remote switch |
4 |
Available in a compatible 3-way installation |
Each button supports seven key attributes:
|
Key attribute |
Action type |
|---|---|
|
0 |
Key pressed once |
|
1 |
Key released |
|
2 |
Key held down |
|
3 |
Key pressed 2 times |
|
4 |
Key pressed 3 times |
|
5 |
Key pressed 4 times |
|
6 |
Key pressed 5 times |
For example:
-
Pressing the main button once sends Scene 1, Key Attribute 0.
-
Double tapping the left dimming button sends Scene 2, Key Attribute 3.
-
Holding the right dimming button sends Scene 3, Key Attribute 2.
-
Releasing the right dimming button sends Scene 3, Key Attribute 1.
The main button still controls the connected load when tapped once unless physical control has been disabled using Parameter 11.
Three taps on the main button also initiate inclusion or exclusion, so this action reports Scene 1, Key Attribute 4 while performing the inclusion or exclusion function.
ZEN12 with a ZAC99 Momentary Switch
If a ZAC99 Momentary Switch is connected to the ZEN12 in a compatible 3-way installation, it can report separately as Scene 4.
To enable Central Scene reports from the ZAC99:
-
Set Parameter 8 to value 1 to enable scene control.
-
Set Parameter 35 to value 2 or 3 for the appropriate momentary switch behavior.
-
Set Parameter 37 to value 1 to enable scene control from the remote switch.
The ZAC99 can then send the same seven key attributes as the built-in ZEN12 buttons.
A standard mechanical on/off switch cannot provide the same range of Central Scene triggers because it changes the electrical state of the traveler circuit rather than providing momentary button input.
Central Scene Summary
-
The main button uses Scene 1.
-
The left dimming button uses Scene 2.
-
The right dimming button uses Scene 3.
-
A connected ZAC99 Momentary Switch can use Scene 4.
-
Each scene supports single tap, release, hold, double tap, triple tap, four taps, and five taps.
-
Parameter 8 must be set to value 1 before Central Scene commands can be used.
Programming Central Scene in HomeSeer
The following steps apply to the HomeSeer Z-Wave Plus plugin:
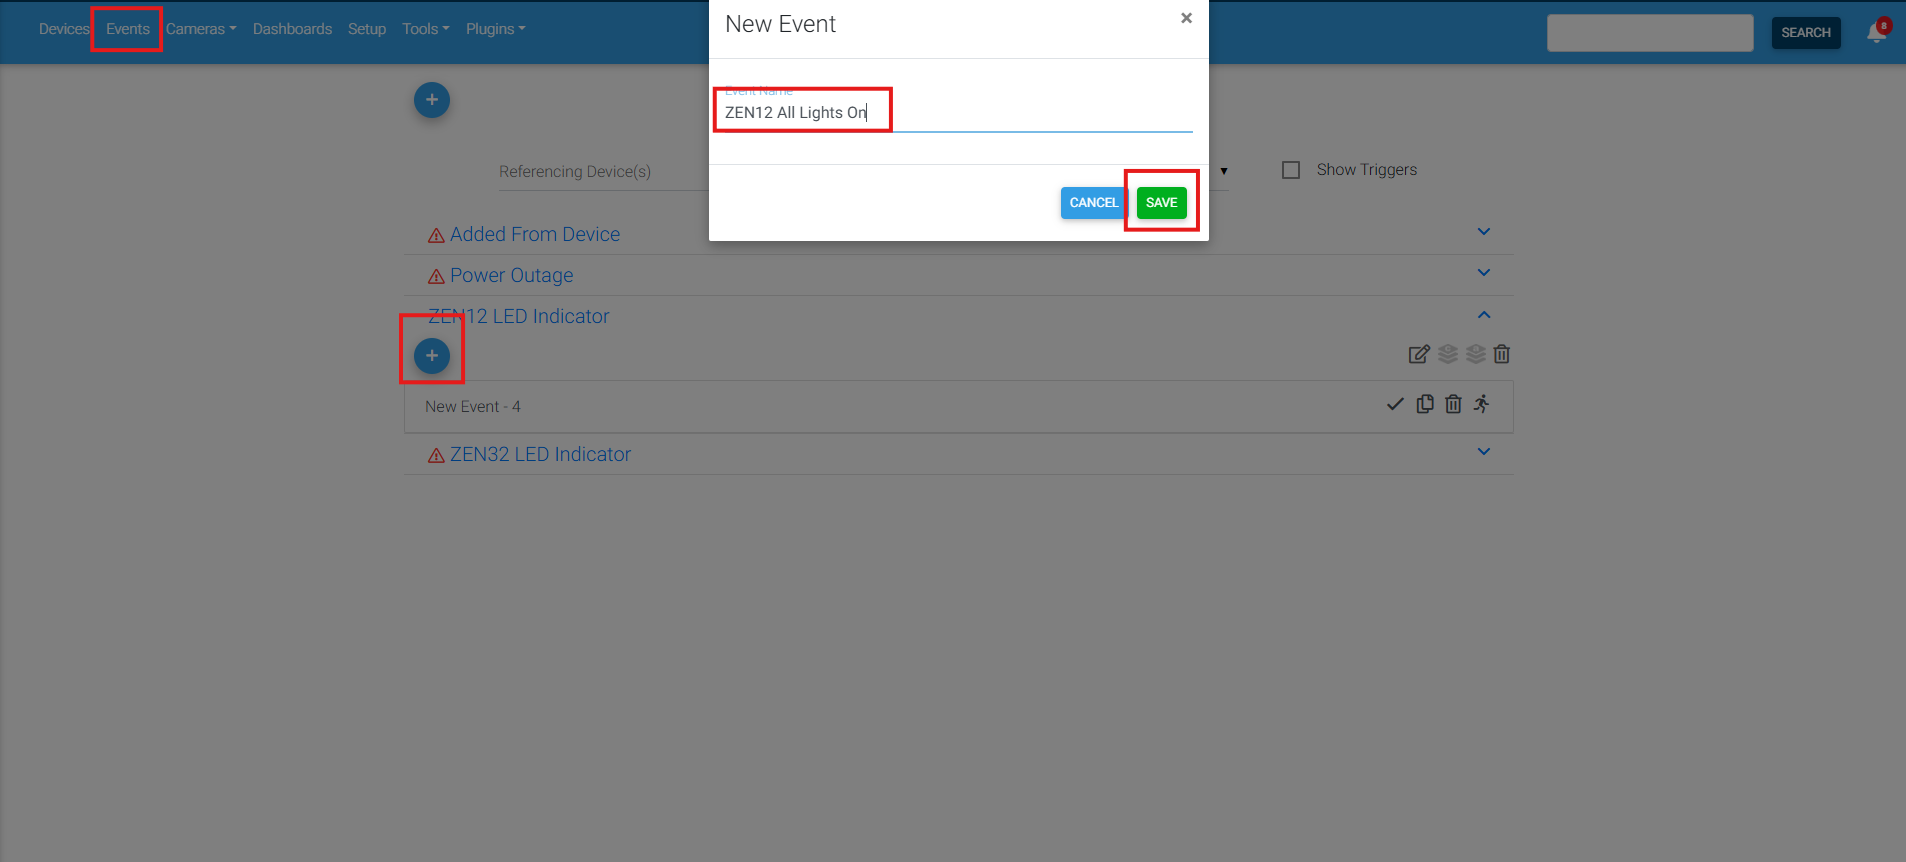
1. Select Events in HomeSeer > click the + symbol to create a new event and enter a descriptive event name:
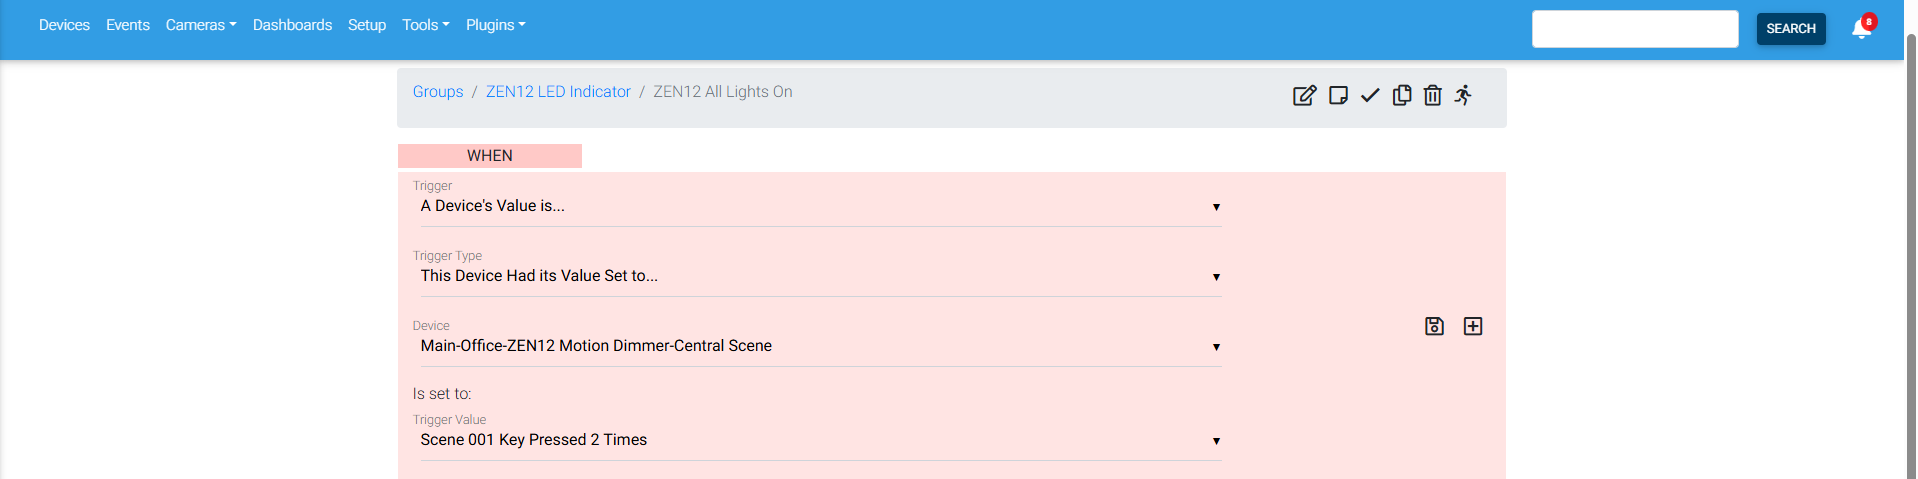
2. In the WHEN section, select the ZEN12 Central Scene device or feature (we recommend selecting the device first, "Central Scene" variant so all fields populate appropriately) > select the appropriate Central Scene trigger > enter the scene number corresponding to the physical button you want to use > select the value or key attribute corresponding to the desired press type:
3. In the THEN section, choose the action you want HomeSeer to perform > select the device or devices that should be controlled > select the desired action, such as on, off, toggle, or a specific dimming level > save the event.
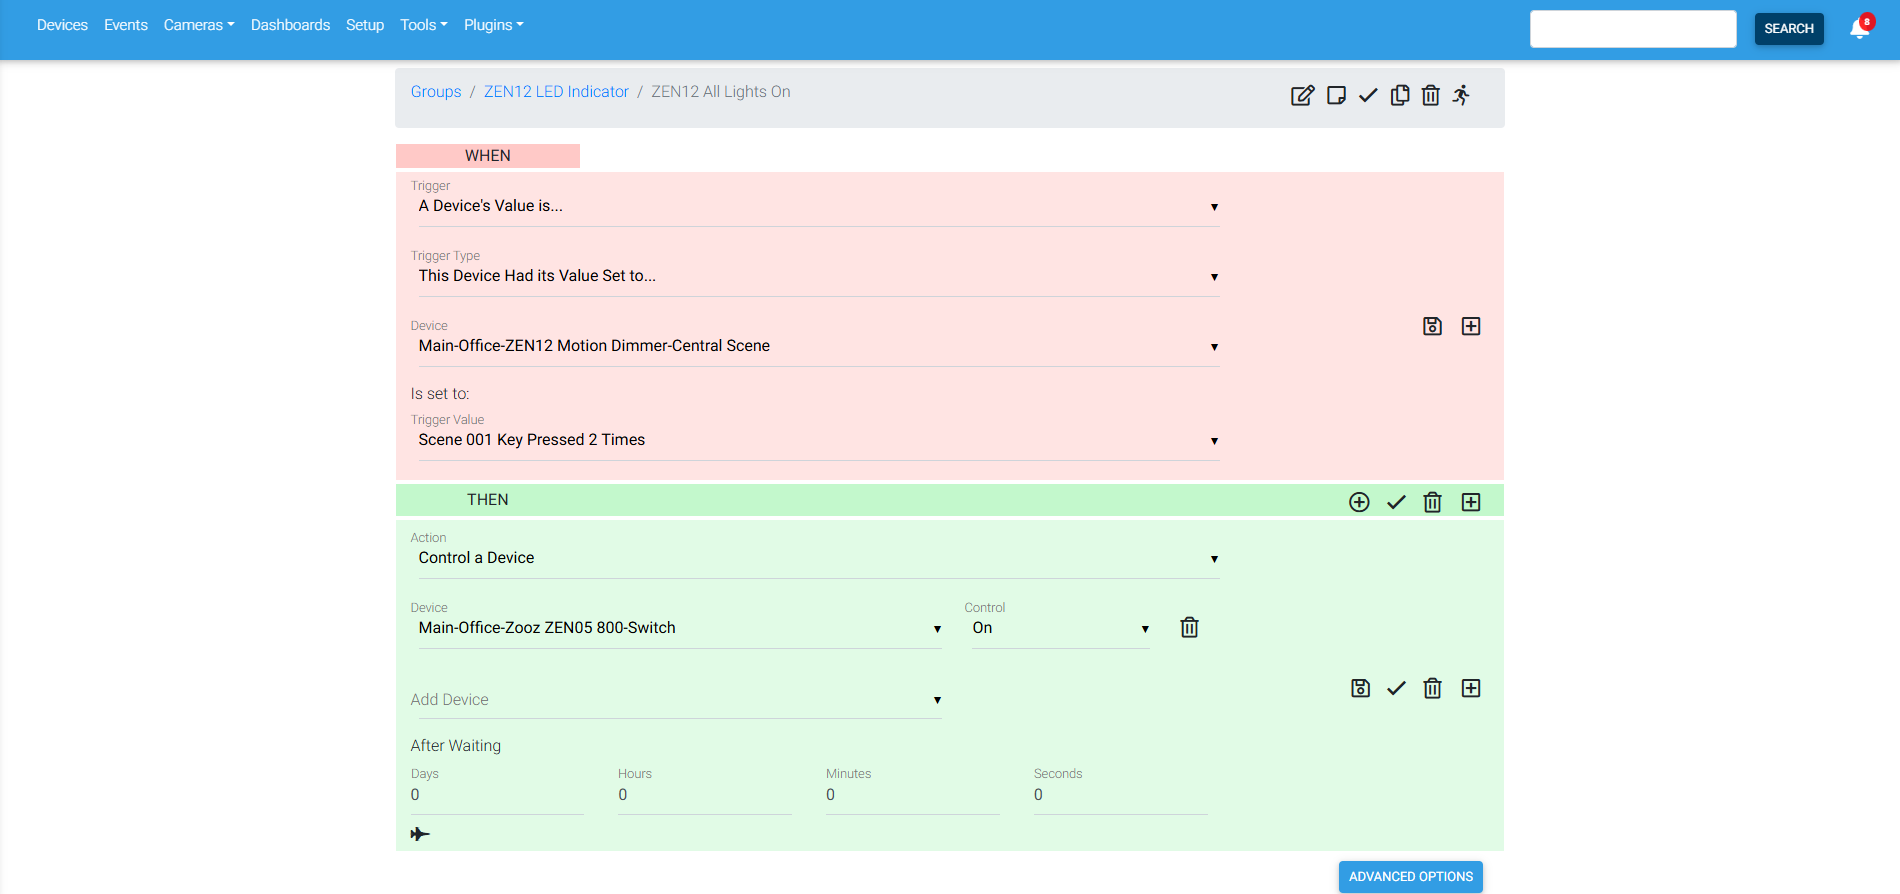
Repeat these steps to assign additional actions to other buttons or press types.
Direct Association
Direct Association creates a direct link between two Z-Wave devices. The ZEN12 sends commands directly to the associated device without requiring HomeSeer to process an event first.
For example, the ZEN12 can directly turn another Z-Wave switch on when motion is detected or control a remote dimmer from its physical buttons.
Direct Association generally provides simple commands such as on, off, set level, start dimming, or stop dimming. It does not provide the same conditions and complex automation options available through HomeSeer events.
Limitations and Considerations
Security Level: Before creating a Direct Association, confirm that the ZEN12 and target device were included with the same security level. For example, a device included with S2 Authenticated security may not associate correctly with a device included using S0 security.
Z-Wave Long Range: Direct Association is not available when either device is included using Z-Wave Long Range. Z-Wave Long Range uses direct device-to-hub communication and does not allow Z-Wave devices to communicate directly with one another.
Device Support: The receiving device must support the command sent by the selected association group. For example, an on/off switch may support Basic Set commands but will not provide dimming control through Multilevel commands.
Status Feedback: Association commands travel from the ZEN12 to the associated device. The associated device does not automatically send its current status back to the ZEN12. If the associated device can be controlled from multiple sources, use HomeSeer events to keep the ZEN12 LED indicator synchronized with its actual status.
You can read more about the requirements and limitations of Direct Association programming here.
Association Groups
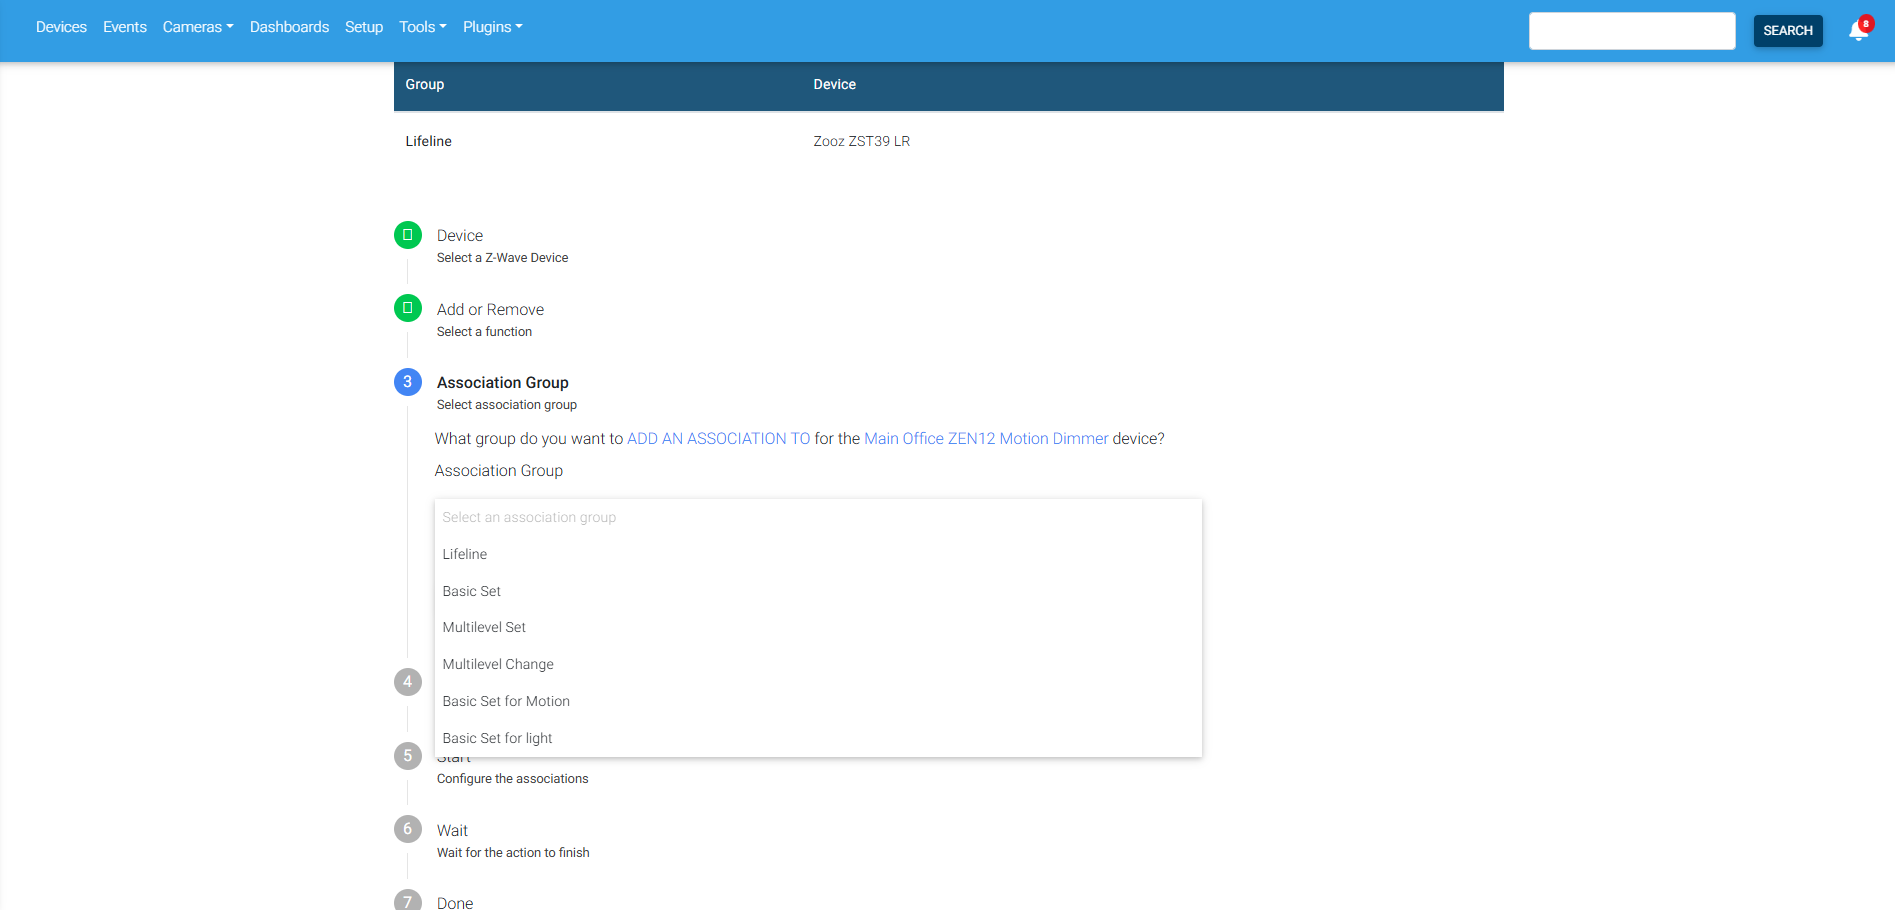
The ZEN12 supports the following association groups:
| Group | Command | Function |
|---|---|---|
| 1 | Lifeline and Basic Report | Communication and status reports to the hub |
| 2 | Basic Set | On/off control from manual operation |
| 3 | Multilevel Set | Brightness-level control |
| 4 | Multilevel Change | Start, stop, increase, or decrease dimming when operated manually |
| 5 | Basic Set | On/off commands triggered by the motion sensor |
| 6 | Basic Set | On/off commands triggered by the lux sensor |
Group 1 is assigned to the HomeSeer controller during inclusion and should not be modified.
Groups 2 through 6 support up to five associated devices each.
Selecting an Association Group
Use the group that matches the type of control you need:
-
Use Group 2 for basic on/off control from the ZEN12 buttons.
-
Use Group 3 to send brightness levels to an associated dimmer or smart bulb.
-
Use Group 4 for press-and-hold dimming control.
-
Use Group 5 to control another device when motion is triggered.
-
Use Group 6 to control another device based on the ZEN12 lux sensor trigger.
A dimmer or smart bulb may need to be added to both Groups 2 and 4 if you want on/off and press-and-hold dimming control.
Parameter 29 controls how long it takes an associated dimmer or smart bulb to move between 0% and 100% when controlled through Groups 3 and 4.
Programming Direct Association in HomeSeer
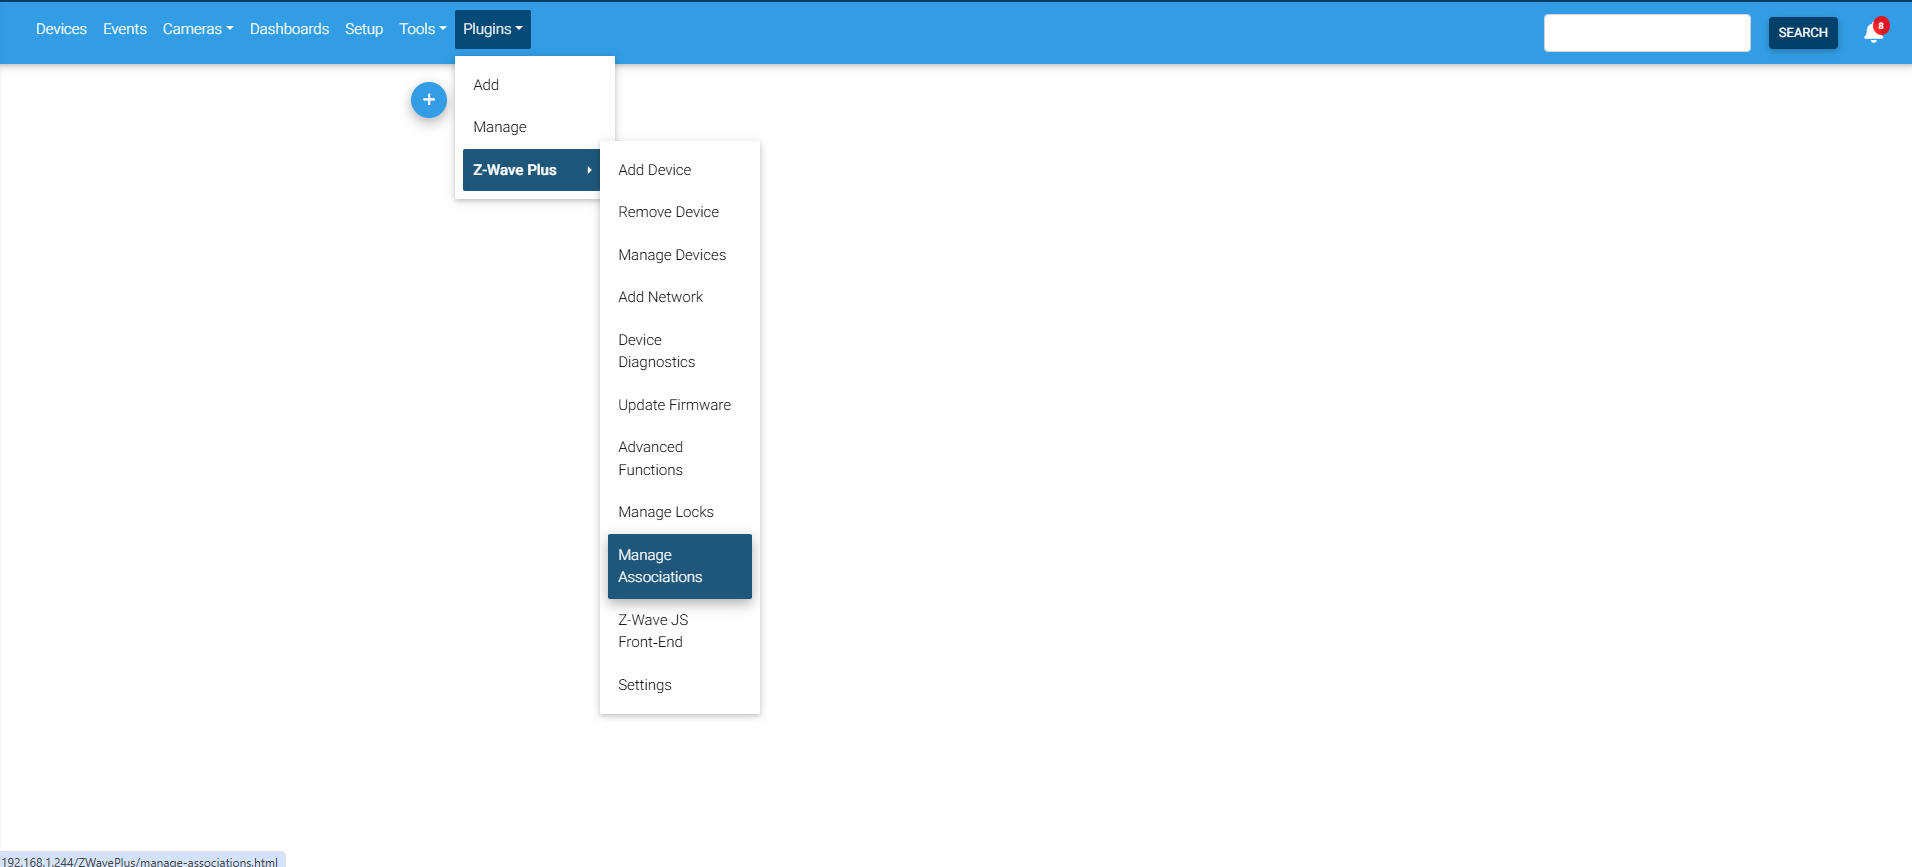
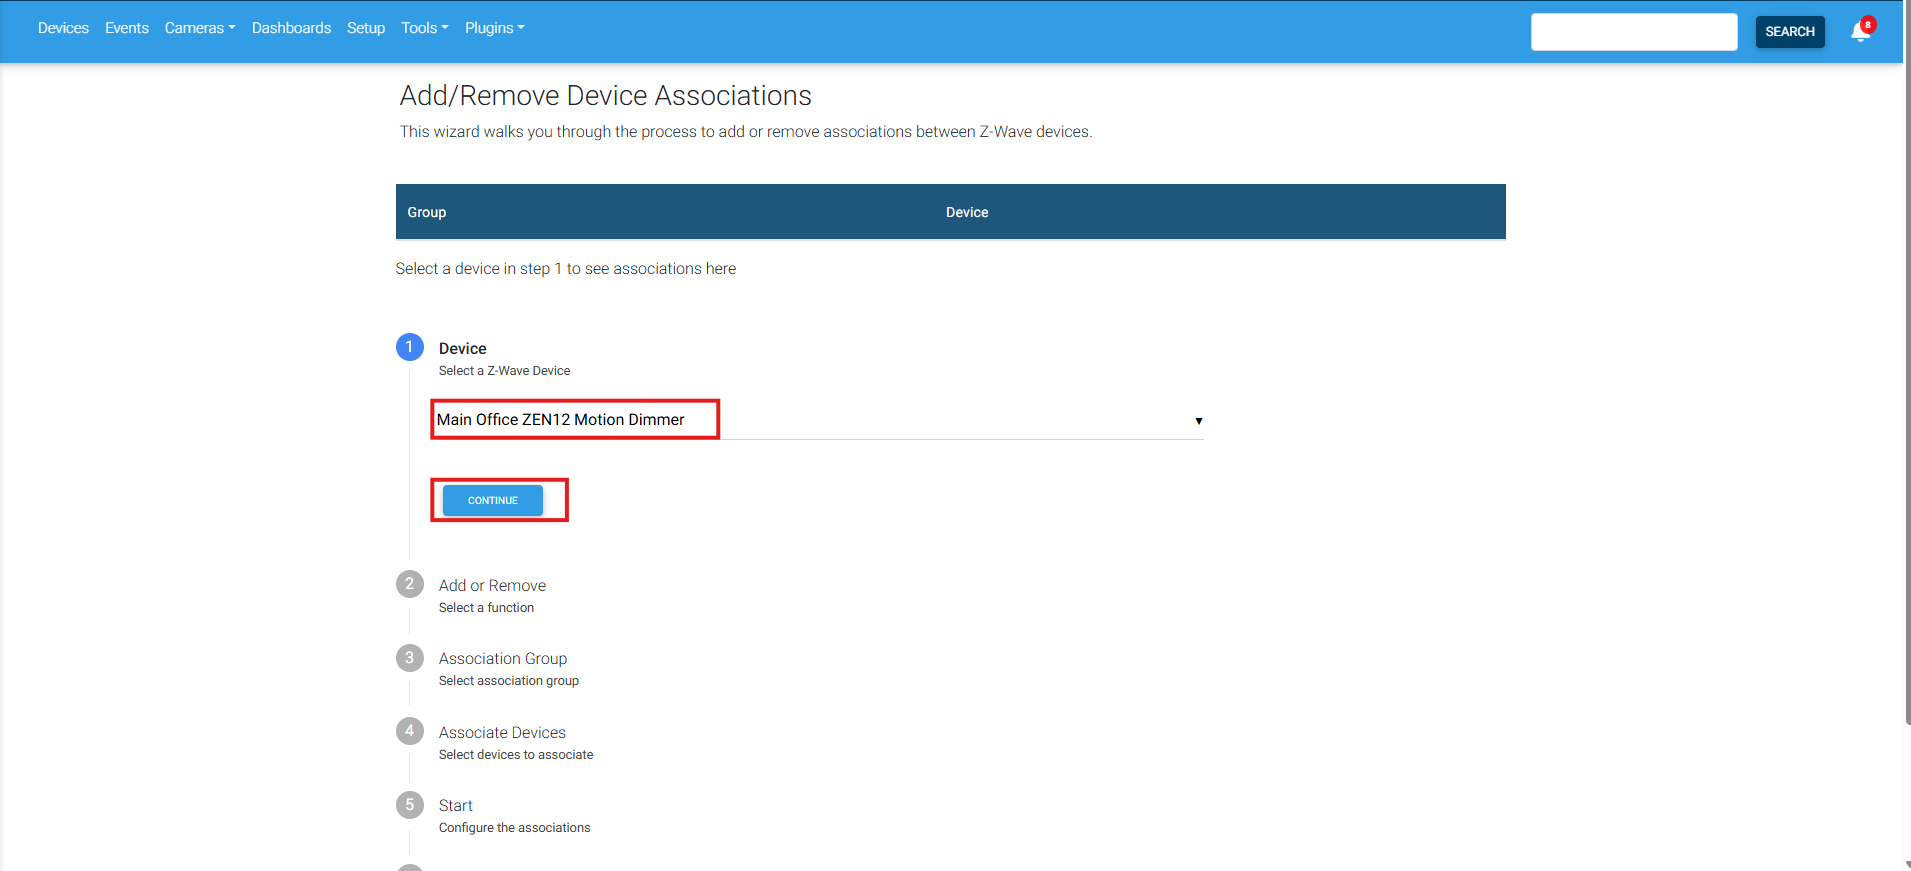
1. Select Plugins in HomeSeer > select Z-Wave Plus > click Manage Associations:
2. Select the ZEN12 Motion Dimmer as the source or controlling device.
3. Select the association group corresponding to the desired function.
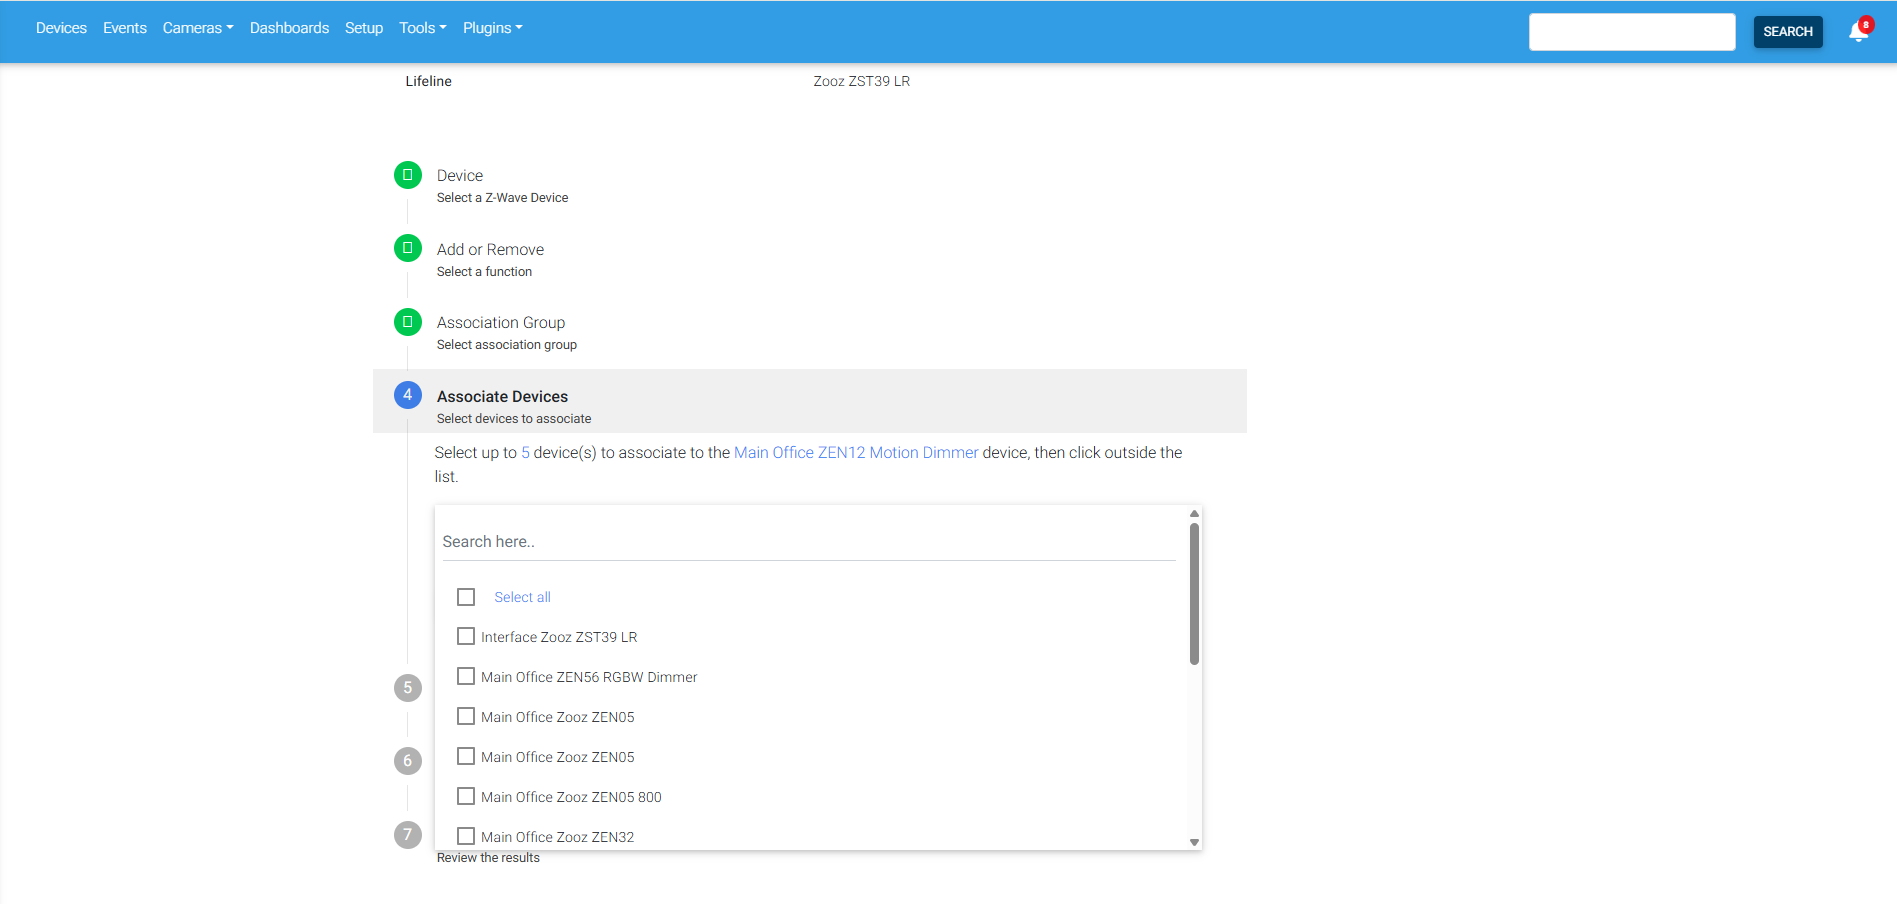
4. Select the Z-Wave device that the ZEN12 should control.
5. Confirm and submit the association.
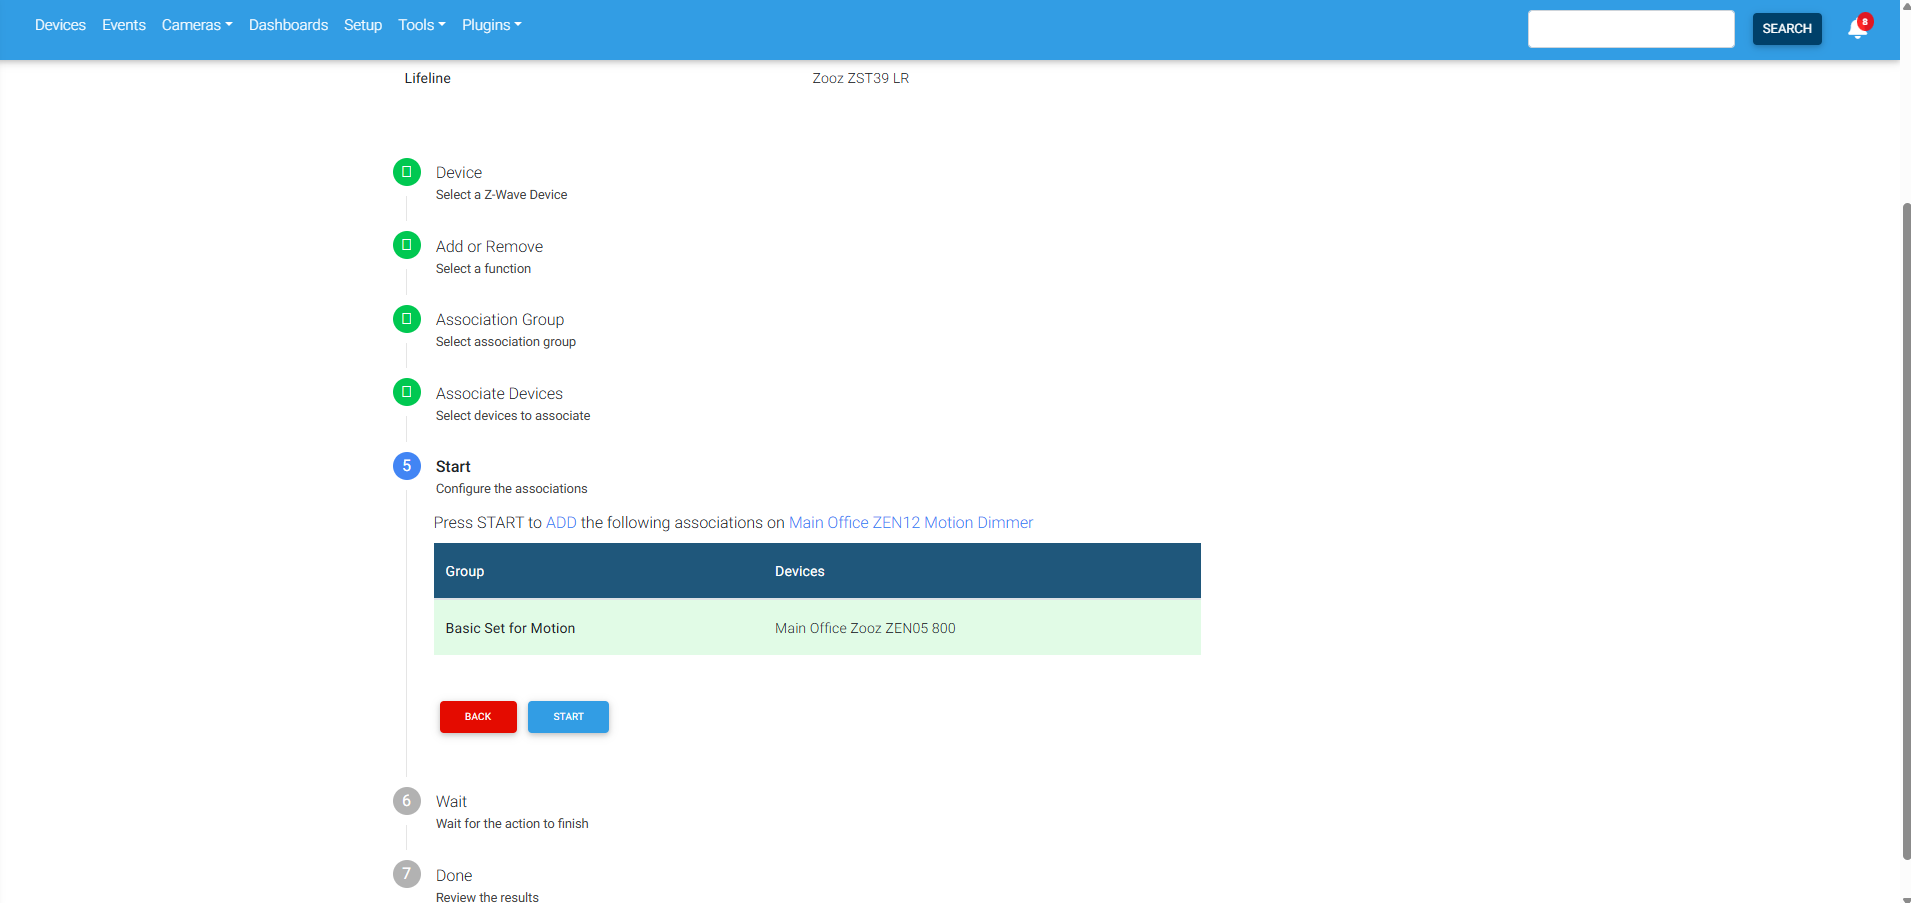
6. HomeSeer will display a message indicating whether the association was completed successfully or an error occurred.
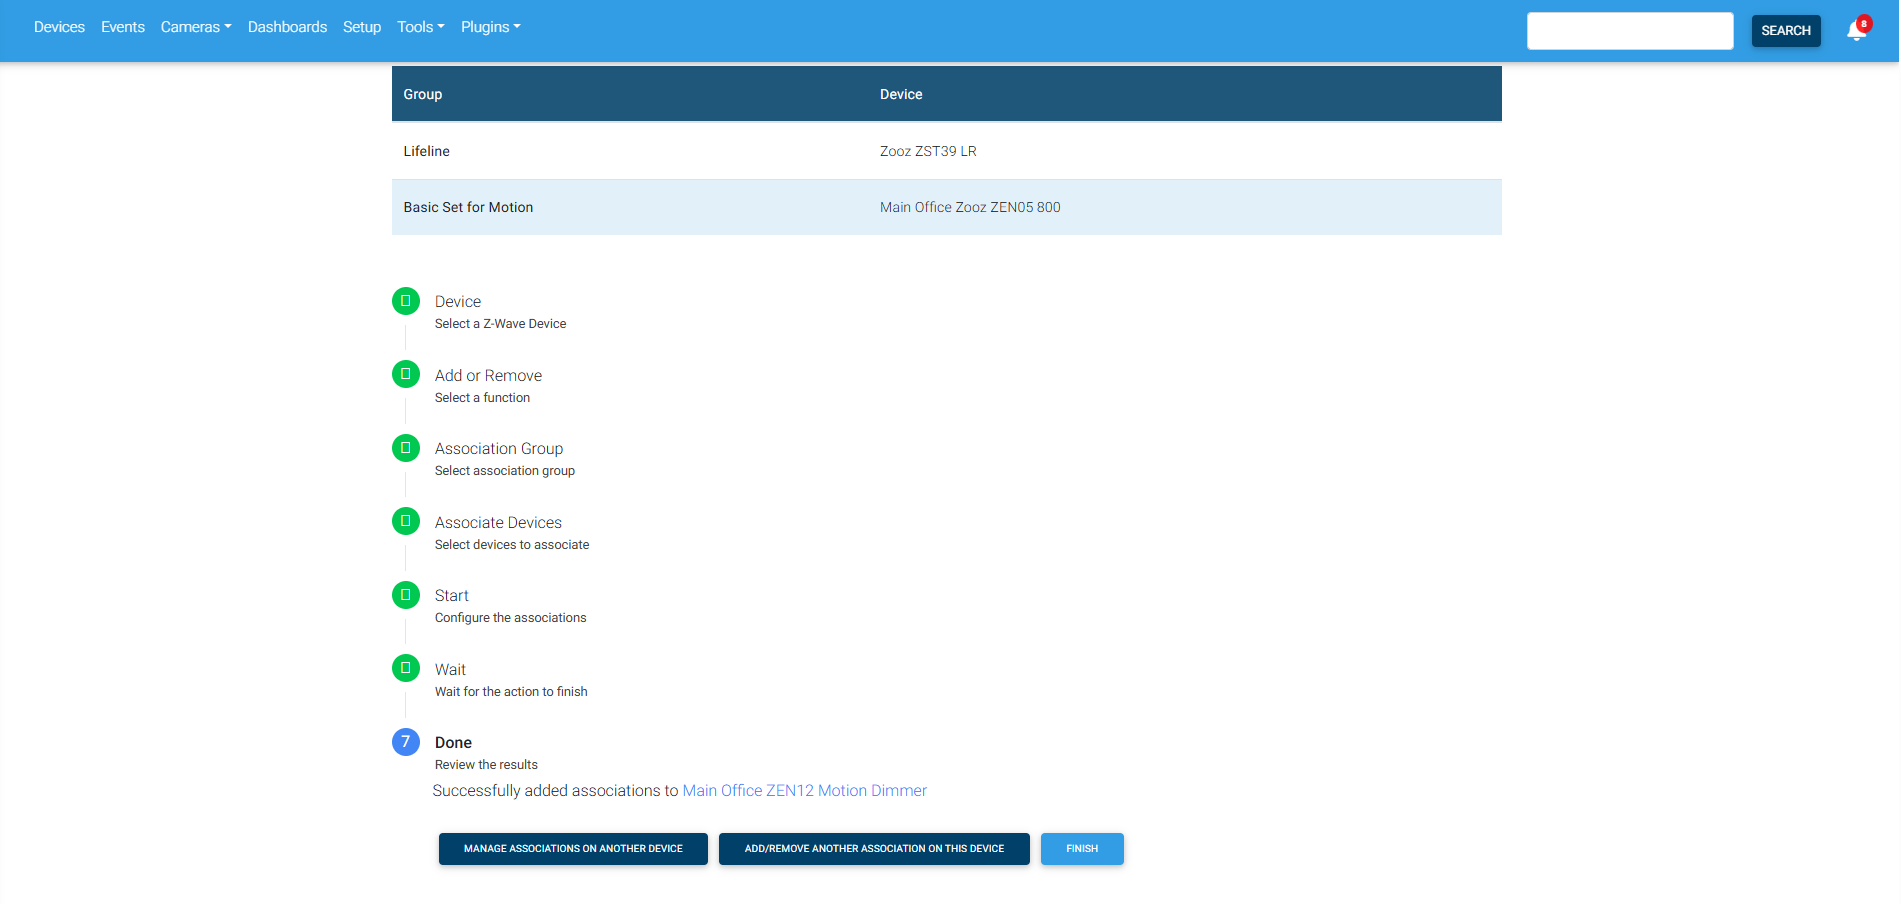
Test the associated function from the ZEN12. If the association is unsuccessful, verify that both devices are included using the same security level, neither device is included through Z-Wave Long Range, and the target device supports the command used by the selected group.
How to Program the LED Indicator on Your ZEN12 Motion Dimmer in HomeSeer
Do you want the ZEN12 LED indicator to reflect the status of another device? The ZEN12 has one multi-color LED banner. By default, the LED reflects the on/off state of the load connected directly to the ZEN12.
If the ZEN12 controls another device through a HomeSeer event or Direct Association, its LED does not automatically receive the status of that device. This can cause the LED and controlled device to become unsynchronized, especially if the other device can also be operated from an app, voice assistant, automation, or another physical switch. To keep the ZEN12 LED synchronized with another device, create two HomeSeer events:
-
One event that turns the LED on when the controlled device turns on
-
One event that turns the LED off when the controlled device turns off
The HomeSeer Z-Wave Plus plugin can change Z-Wave configuration parameters as an event action, allowing the LED indicator to be updated automatically.
LED Mode Parameter
Parameter 1 controls the LED indicator mode:
|
Value |
LED behavior |
|---|---|
|
0 |
LED on when the ZEN12 load is off |
|
1 |
LED on when the ZEN12 load is on |
|
2 |
LED always off |
|
3 |
LED always on |
Parameter 1 uses a size of 1 byte.
For example, to have the ZEN12 LED reflect the status of a remotely controlled bedroom light:
-
When the bedroom light turns on, set Parameter 1 to value 3.
-
When the bedroom light turns off, set Parameter 1 to value 2.
Create the LED-On Event
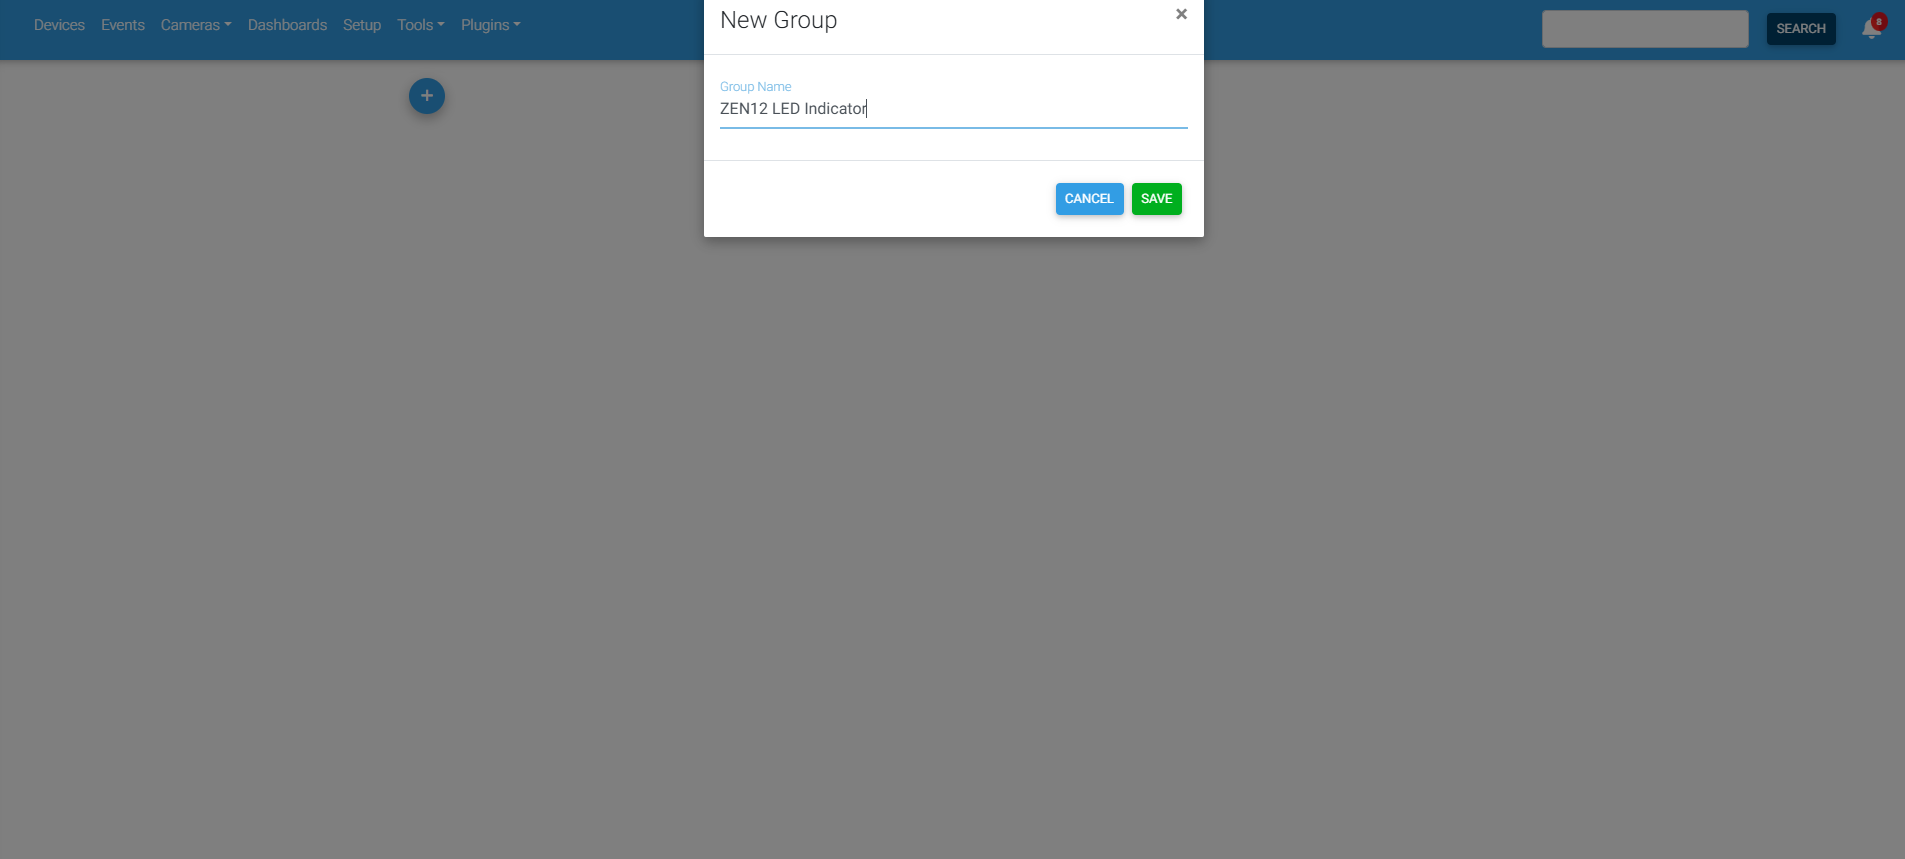
1. Go to Events in HomeSeer > click the + symbol to create a new event and enter a descriptive name, such as “ZEN12 LED On.”
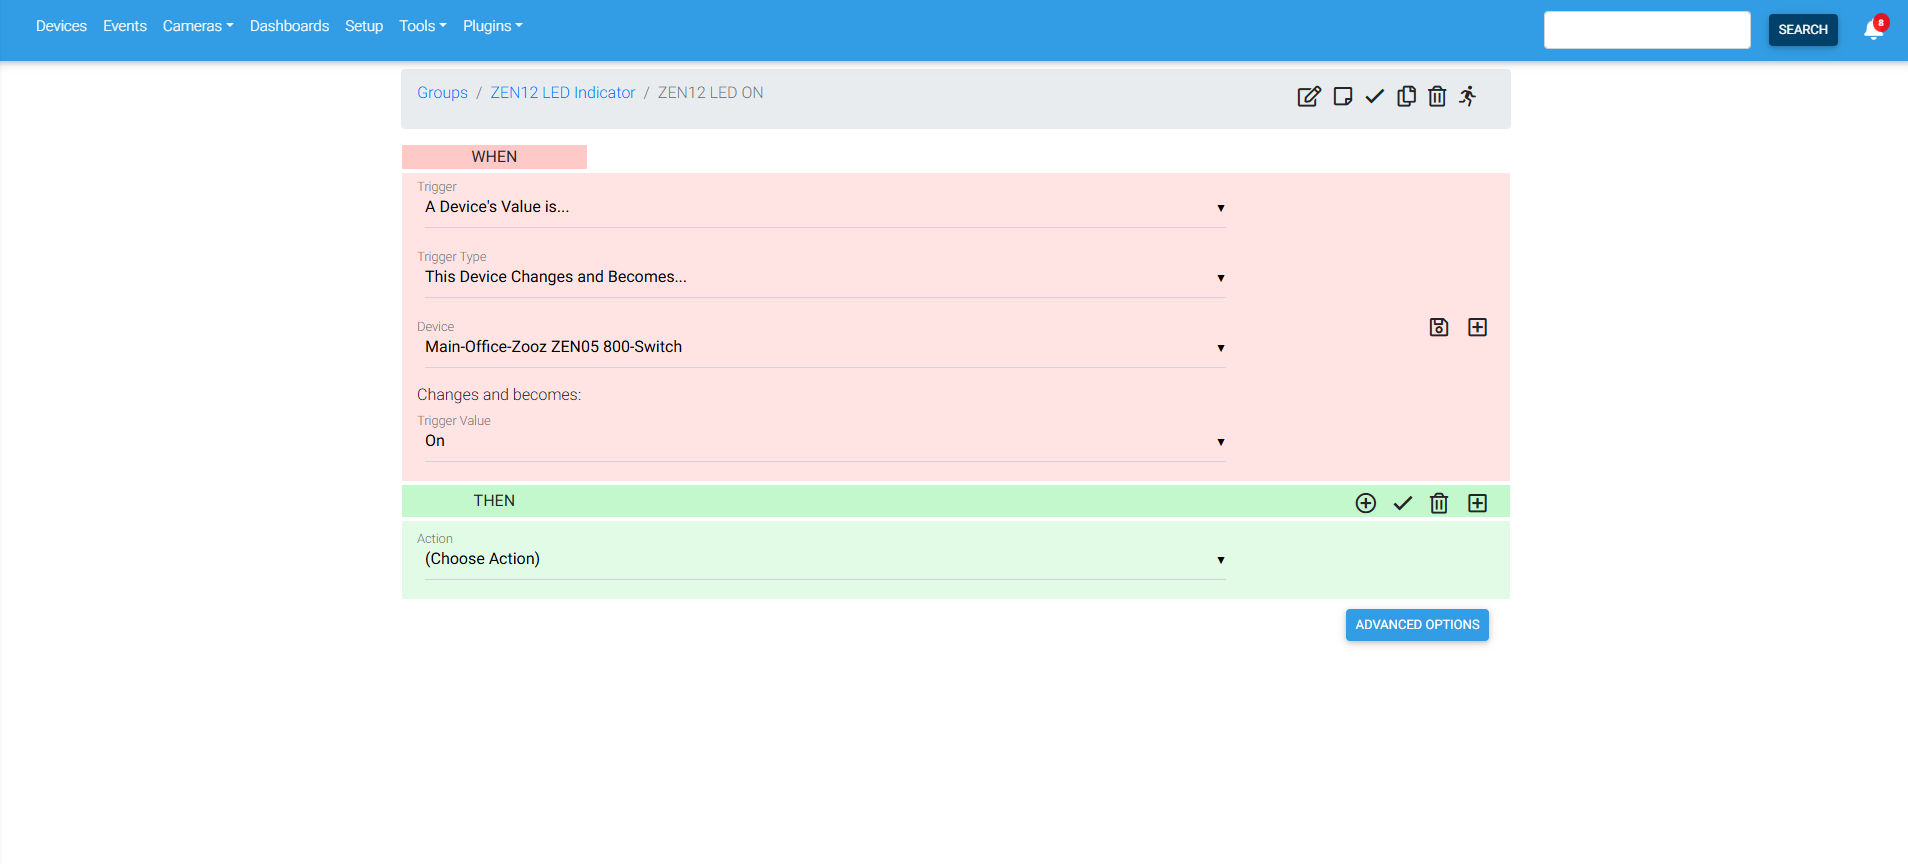
2. In the WHEN section, select the device whose status the ZEN12 LED should display > configure the trigger to run when the device changes and becomes On.
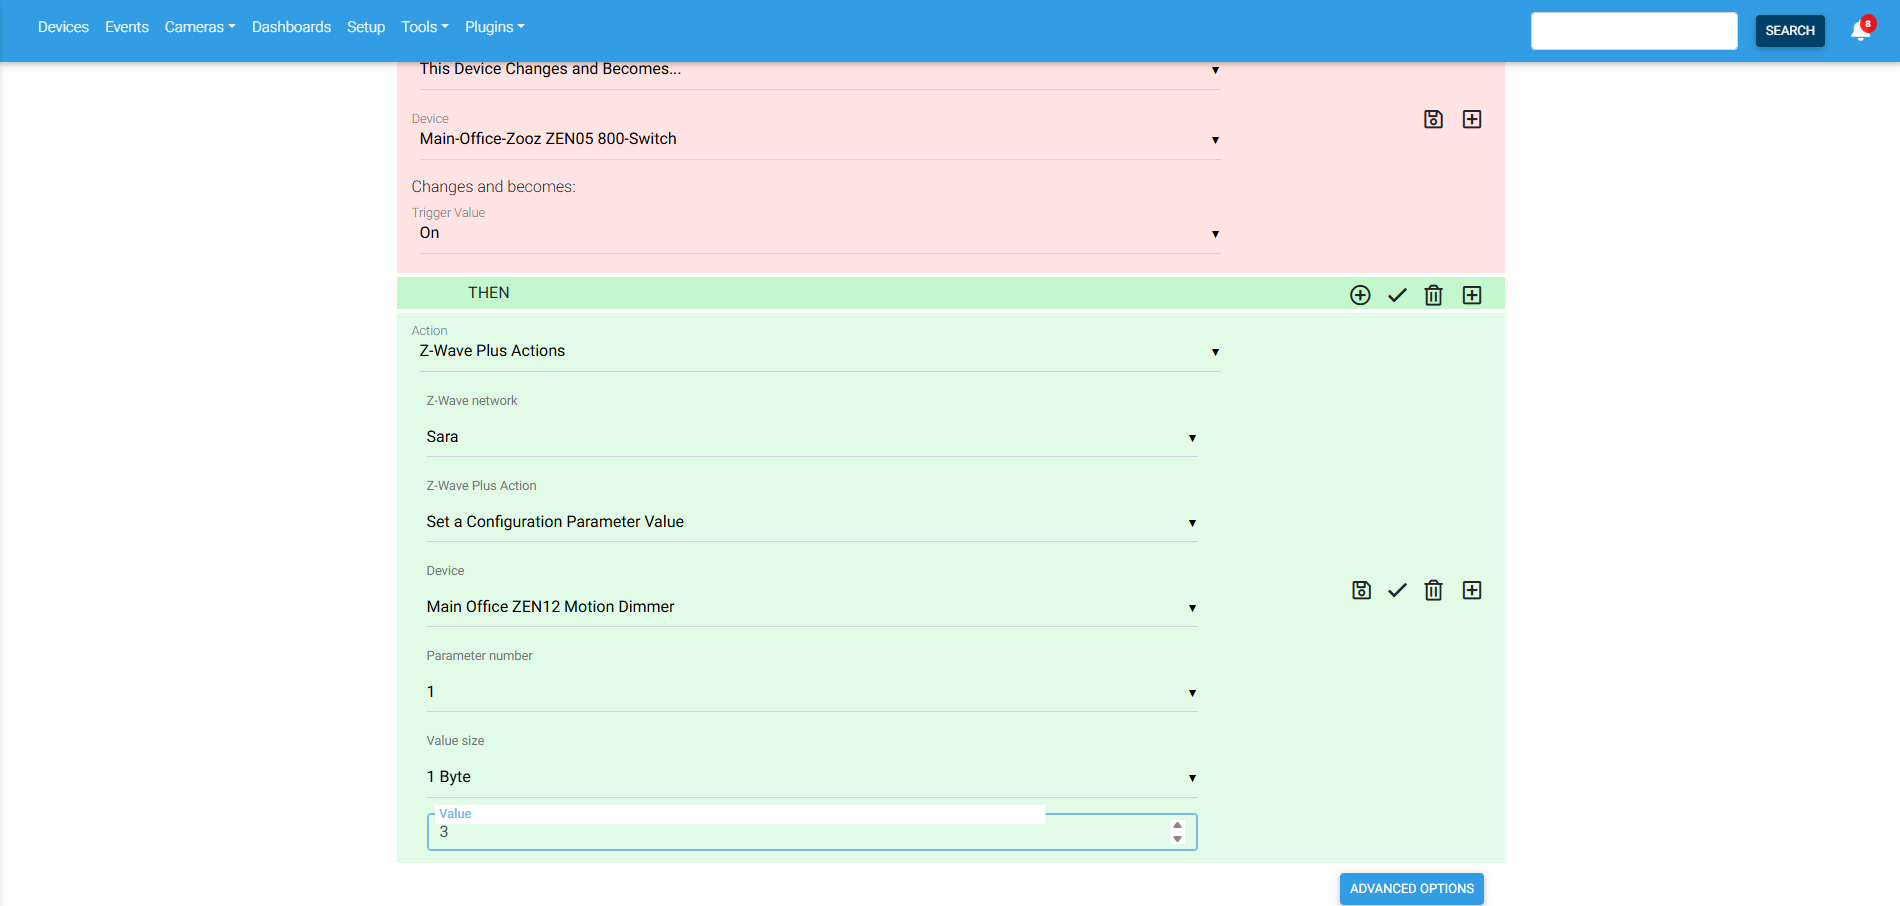
3. In the THEN section, select a Z-Wave Plus action > select Set a Configuration Parameter Value > select the ZEN12 Motion Dimmer > enter Parameter 1 > enter a value of 3 to set the LED to always on > select a parameter size of 1 byte > save the event.
Use the same format to create another automation that turns off the LED on the ZEN12 based on the ZEN05 off status. Once done with both automations, the ZEN12 LED will now turn on and off based on the status reported by the controlled device, regardless of whether that device was operated from the ZEN12, HomeSeer, another automation, or another physical control.
Setting the LED Color
Parameter 2 controls the primary LED indicator color:
|
Value |
Color |
|---|---|
|
0 |
White |
|
1 |
Blue |
|
2 |
Green |
|
3 |
Red |
|
4 |
Yellow |
|
5 |
Cyan |
|
6 |
Magenta |
Parameter 2 uses a size of 1 byte.
The color only needs to be set once unless you want the color itself to change as part of an automation. For example, setting Parameter 2 to value 1 will make the LED indicator blue.
Using Two LED Colors
Parameter 45 allows the LED to display a second color instead of turning completely off in the opposite switch state.
| Value | Opposite-state color |
|---|---|
| 0 | Off |
| 1 | White |
| 2 | Blue |
| 3 | Green |
| 4 | Red |
| 5 | Yellow |
| 6 | Cyan |
| 7 | Magenta |
Parameter 45 uses a size of 1 byte.
For example, the LED can be configured to display green in one state and red in the opposite state. This is useful when you want the LED to provide a visible indication in both states.
This option follows the ZEN12’s own switch state when Parameter 1 is set to value 0 or 1. If you are using HomeSeer events to represent the state of a different device, you can instead create separate event actions that change Parameter 2 based on the controlled device’s reported status.
Setting the LED Brightness
Parameter 3 controls the brightness of the LED indicator:
-
Values 1 through 10
-
Value 1 represents 10% brightness
-
Value 10 represents 100% brightness
-
Default value: 5
-
Size: 1 byte
The LED brightness only needs to be configured once unless you want HomeSeer to adjust it dynamically.
Disable the Confirmation Flash
The ZEN12 normally flashes its LED indicator whenever a configuration parameter is changed. This confirmation flash may interfere with LED automations, especially if HomeSeer changes the indicator frequently.
For more consistent LED behavior, set Parameter 23 to value 1:
-
Parameter 23: Disable LED Indicator Flash on Setting Change
-
Value 0: LED flashes when a setting is changed
-
Value 1: LED does not flash when a setting is changed
-
Size: 1 byte
Scene Indicator
Parameter 9 can temporarily use the LED banner to confirm which button and press type generated a Central Scene command.
-
Value 0: Scene indicator disabled
-
Value 1: Scene indicator enabled
-
Size: 1 byte
When enabled, the ZEN12 uses the following colors:
|
Button |
Scene indicator color |
|---|---|
|
Main button |
White |
|
Left dimming button |
Blue |
|
Right dimming button |
Green |
|
ZAC99 remote switch |
Red |
The number of illuminated sections represents the number of taps:
-
One tap illuminates one LED section for two seconds.
-
Two taps illuminate two LED sections for two seconds.
-
Three taps illuminate three LED sections for two seconds.
-
Four taps illuminate four LED sections for two seconds.
-
Five taps illuminate five LED sections for two seconds.
-
A held-button event illuminates the left and right LED sections for two seconds.
The Scene Indicator is separate from using the LED to represent the status of another device. If you want the LED to remain dedicated to device-status feedback, leave Parameter 9 set to 0.
For more information about the device and its available functions, refer to the ZEN12 Motion Dimmer Product Manual and ZEN12 Motion Dimmer Advanced Settings.
Please contact Zooz Support if you have any questions about programming your ZEN12 Motion Dimmer.

