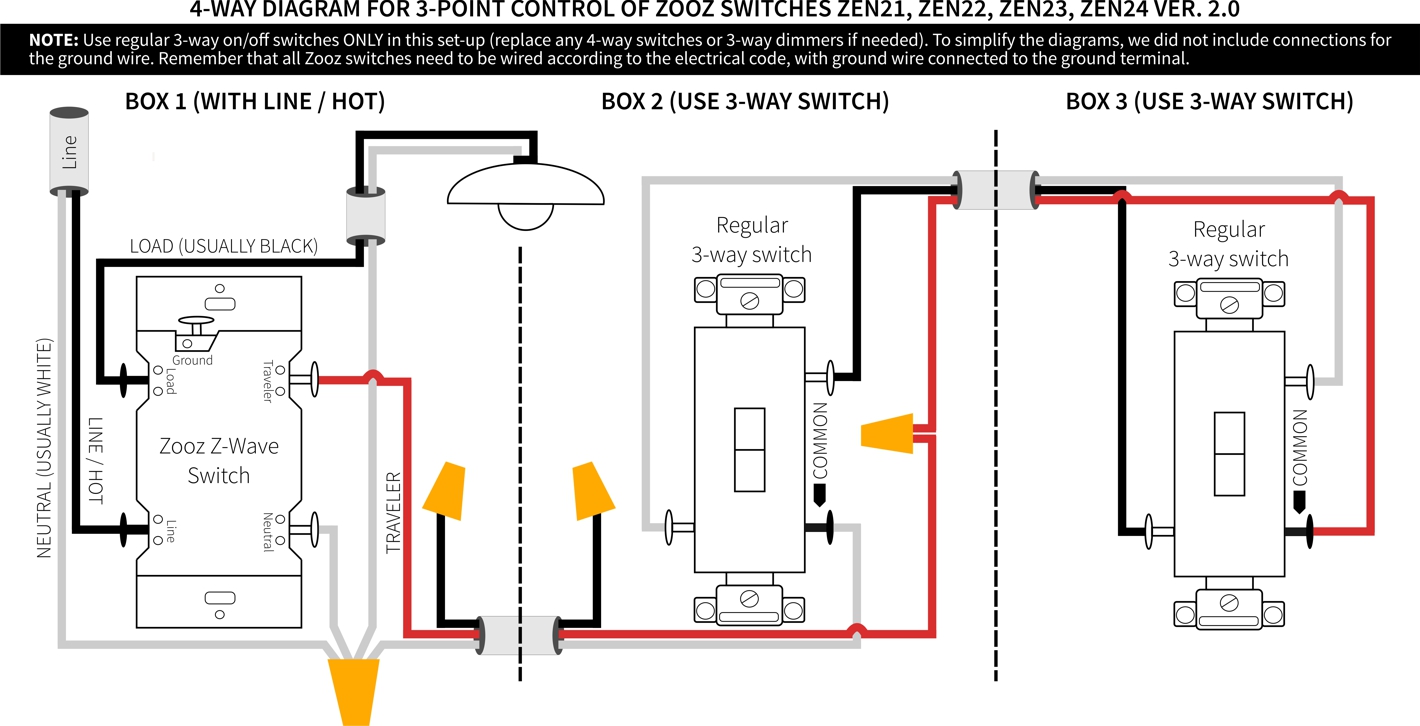
Zooz 500 series switches (ZEN21, ZEN22, ZEN23, ZEN24) can be wired in 4-way set ups, but take note of these caveats before going ahead with the installation:
(These are discontinued products, replacement models: ZEN71, ZEN72, ZEN73, and ZEN74 - note that the ZEN73 and ZEN74 models wire differently in 3-way and 4-way installations, always use the appropriate instructions when wiring your switches) What does that mean?
- A 4-way is what we call 3-point control so 3 different switches controlling the same set of lights (if you're looking for 4 point control with 4 switches in the install, click here).
- Zooz can only be wired in a 4-way if you have load and line in the same box. If you have load and line separated between two boxes, there's no way to wire these Zooz models with the two other existing switches.
- If you have load and line in separate boxes, look into our S2 switches. Zooz S2 switches have an different wiring schematic that allows you to use the switches in 4 and 5-ways where load and line are separated. Here's more about wiring S2 switches in 4-ways (NOTE: the wiring for S2 switches is different than for the ZEN21, ZEN22, ZEN23, and ZEN24 switches. Do not try to wire S2 models and the models from this article the same way).
- Take a look at the diagram below - only 3-way switches are in use. You will need to replace your 4-way switch with a 3-way switch instead. You should have one extra since one box will be replaced with the Zooz switch.
- The diagrams show all connections but ground (the ground wire was excluded in order to simplify the illustrations).
- Colors and location of the common screw on the 3-way switches are just for illustration and will not always match your set-up so please don't follow the colors or screw orientation blindly.
- Use only simple on/off switches without LED indicators when wiring them with Zooz Z-Wave switches (no dimmers!).
- All boxes need to be rewired.
4-ways are tricky and even electricians sometimes have trouble making the connections right. Follow the diagram exactly as shown, making sure the Zooz switch is installed in the box with line and load in it.

If you have any questions about the process - hold off on the wiring! Reach out to us with any questions. We'll be happy to help.


